Showing posts with label ring. Show all posts

Tuesday, March 18, 2014

Item of the Week - March 18th

Vintage Men's Turquoise and Coral Ring / Mexican Silver and Turquoise / Turquoise Ring / Size 11

https://www.etsy.com/listing/179246608/vintage-mens-turquoise-and-coral-ring?ref=shop_home_active_1
This is a handsome vintage men's ring. It's not marked, but likely Mexican silver, with two shades of blue turquoise, coral and malachite stones. This ring is very bold and quite solid and heavy.

| MEASUREMENTS |

Length: 1 1/2"
Width: 1"
Ring Size: 11

| DETAILS |

Era: 1960s
Style: Southwestern
Material: Silver, turquoise, malachite and coral
Colors: Silver, turquoise, coral, green, red, blue
Condition: Metal has some patina and wear due to age.

Tuesday, March 4, 2014

Vintage Item of the Week - March 4th

Vintage Turquoise Ring / Mexican Silver and Turquoise / Size 7

https://www.etsy.com/listing/179392670/vintage-turquoise-ring-mexican-silver?ref=shop_home_active_10
This is a lovely vintage Mexican silver and turquoise ring. It's unmarked, but has absolutely stunning metal work and a huge, heavily veined blue turquoise stone that is naturally cut. Along one side is a feather and all along the edge of the stone are silver curly-cues. Very lovely design!

| MEASUREMENTS |

Length: 1 1/4"
Width: 1"
Ring Size: 7

| DETAILS |

Era: 1960s
Style: Southwestern
Material: Silver and turquoise
Colors: Silver and turquoise
Condition: Excellent, metal in great condition.

Wednesday, May 2, 2012

Crafty Me - Turning a Pair of Heels into a Ring Display

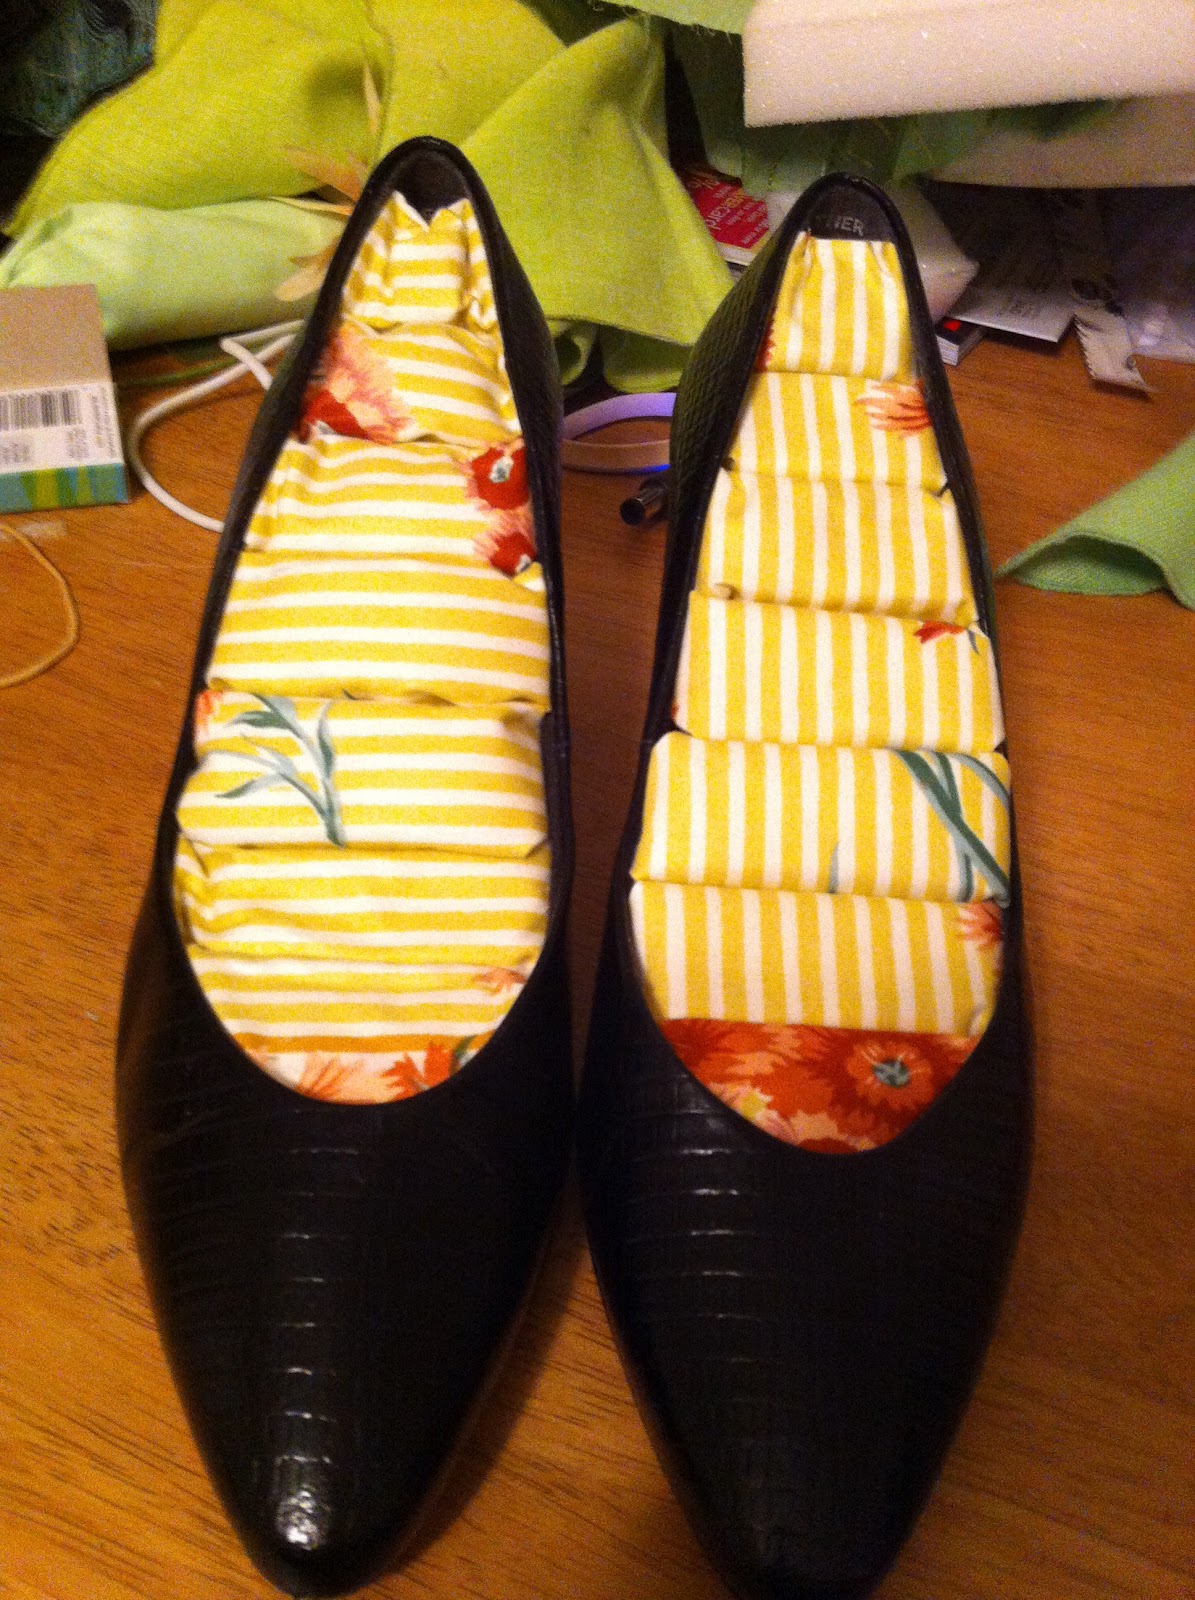
I saw a photo of a super cute ring display online the other day and I thought - I can make that! It starts with a pair of heels, cute fabric and a piece of seat foam!

I've been thrifting vintage shoes for awhile now and I really loved the faux alligator print on these black heels, but the lining was pretty shot. So I decided to  use them for my project. They were the perfect size and shape for what I wanted to accomplish.

The fabric I picked up at The Upcycle Exchange - I traded in a bunch of costume jewelry pieces and odds and ends for store credit and loved this because of the lime green stripes that are very similar to my logo. I thought the fabric would look cute, but hopefully not be too overwhelming once rings were added to it. I made a point to minimize the amount of flowers you see so that print wouldn't be too busy.

There are only four other items you need to complete this project - scissors, fabric glue, foam cushion and a pen. I bought the foam cushion at an arts and crafts store - it was meant to be a seat cushion for a chair, but it's the perfect amount for a smaller project like this.


Supply list:
  • A pair of heels
  • Fabric (about 1/4th of a yard)
  • Foam cushion (1-1 1/2in thick)
  • Fabric glue
  • Scissors
  • Pen


Step One - Foam Patterns
Trace the toe of the shoe on the foam. You'll want to be pretty close to perfect on this, as this particular piece will slide down into the shoe itself. You should measure it to be about 1/2in longer than where the lip of the toe starts, that way it sticks out enough when put in the shoe to actually hold a ring. (See photos)

Once you have traced out the toe of the shoe measure the width of the shoe every 1in or so. You'll need to cut out pieces in these lengths for the rest of the holders.  I needed seven pieces for this pair of heels, but you may need more or less depending on the thickness of your foam and the length of the shoe. I made each of my foam pieces 1in wide and then the different length measurements I had taken earlier.


Basic Foam Pattern Idea


Step Two - Fabric Pattern


The next step is creating fabric patterns for each piece of foam. You want to measure each piece of foam and then trace a pattern on the fabric to match it. You'll measure the length of the foam and add an inch to each side, then you'll measure the height, double it and add it to the width. So if you have a 2in x 1 1/2in by 1in piece of foam your fabric square should be 4in by 4in. (Note, I did not cover the bottom of the foam pieces, the bottom of the cubes was left uncovered so it would be even).


Step Three - Glue Fabric to Foam

Cut out your fabric squares and then we're ready to glue! This step is like wrapping a present. I put fabric glue all over the fabric, lined the edge of one of my cubes of foam up to the edge of the fabric (be sure to leave yourself the inch on either side) then rolled the cube so the fabric covers one side, then the top, then the second side. From here you'll create the little folds on the edges just like wrapping a box, adding glue as you need to hold down the flaps. Do this to both edges so that only the bottom of your foam cube is uncovered.

Do this with all of your foam cubes.

Step Four - Assemble

Here I put glue on the inside of the shoe and began placing my fabric covered foam inside the shoe just like the pattern showed. First the pointed toe, then the longest piece of foam to the shortest piece of foam. You want the foam to fit snug, but not too snug that it bunches up. Let the glue dry and you're all set!




Friday, March 23, 2012

Friday, January 27, 2012

Valentine's Day Special - For the Guys

Shopping for Valentine's Day gifts can be hard. Well gentlemen, I'm here to take the pain out of it! I'm offering a special in the shop in honor of this special day!

Go to my Etsy shop and select the item or items you think your wife, girlfriend or lady friend would like. In the comments section write "Wrap this please." Then in the coupon section type FREESHIP. I'll wrap your item in pretty, Valentine's appropriate, boxes or bags and ship it to you, for FREE! You get to reap the rewards for an awesome gift and I help take out all the extra work!

Here's a peak at some of the items available for you to choose from!


Thursday, January 12, 2012

Hawaiian Diamonds


 The other day at an auction I picked up a 3-piece set of vintage costume jewelry that I liked because you don't find a set with a necklace/brooch (the pendant has a pin on the back so you can wear it as a brooch instead of a necklace), earrings and a ring that are a perfect match in vintage. Plus these looked really beautiful, the bright goldtone filigree really set off the green stone and the coral.

When I got home I found a slip of paper inside the box that was written in very shaky handwriting, but from the description the two things I took away were "Hawaiian" and "Diamond." I have to say the word diamond really perked my attention, but I had never seen diamonds that looked like this. The Hawaiian motif made sense - I mean the pendant is three pineapples in a basket! However, I put the pieces aside and didn't get back to them until earlier this week when I was putting together a Treasury on Etsy featuring peridot, my birthstone for the month of August.

While searching Etsy for peridot items to feature I came across a pineapple brooch that looked a lot like my set and discovered that, indeed, they were very similar. I read the description for that brooch and it turns out that "Hawaiian Diamonds" are actually uncut olivine, the mineral that peridot is created from! So I started doing more research and learned that in the United States peridot can be found in Arizona and New Mexico and also in Hawaii, where it is known as "Pele's Tears" after the Hawaiian goddess. 

Olivine forms as certain types of lava cool, before it breaks through the surface. This type of rock is called basalt and from the basalt you can harvest olivine. Olivine gets it's color from the iron found in the mineral and the more pure the green color, the more it is worth.

Today most of the peridot found in the United States comes from Arizona on the San Carlos Reservation. However, larger amounts of peridot used to be found in Hawaii on the Island of Oahu. In fact if you visit the island there is a beach where the sand is green! If I ever make it to Hawaii, that beach will be top of my list!

The set I have is most likely from the 1950s and is a very common design from Hawaii. The stones on the pieces are peridot that is uncut, but smoothed. The pink flowers and pineapple bodies are actually cut coral and then the goldtone metal is formed around the stones for a very natural setting in the earrings and ring.

So while Hawaiian Diamonds don't have the same value as actual diamonds, they have a pretty awesome story and history!

Just for fun, facts about peridot:
  • Peridot has been found in ancient Egyptian and Grecian ruins
  • Ancient peridot came from the Red Sea island of St. Johns
  • Peridot forms during volcanic eruptions
  • The largest cut peridot is 310 carats and located in The Smithsonian Institute
  • It is thought that peridot brought power and influence to the owner
  • Peridot has been found in meteors that have fallen from space
  • Peridot has been mined for more than 3,000 years - since 1500 BC