Saturday, April 20, 2013

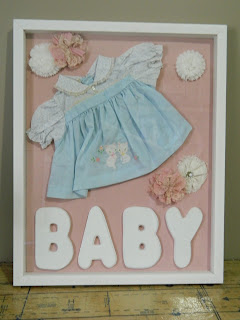
Baby Gifts - The Vintage Shadow Boxes

https://www.etsy.com/listing/127488920/vintage-blue-and-pink-childs-dress?ref=shop_home_active
Back in November I wrote a post that was more of a "How To" feature about making a shadow box with antique baby clothes for a close friend. I enjoyed the process quite a bit and thought - these would make truly lovely, original gifts and quite possibly family heirlooms! I began to pull out the rest of my vintage baby wear and to pick up a few additional pieces.

Here are the fruits of my labor: 

https://www.etsy.com/listing/124340455/vintage-blue-baby-bloomers-shadow-box?ref=shop_home_active
https://www.etsy.com/listing/124338588/little-girl-vintage-pink-bloomers-shadow?ref=shop_home_active

https://www.etsy.com/listing/124345048/vintage-pink-baby-dress-shadow-box?ref=shop_home_active
https://www.etsy.com/listing/124342599/vintage-blue-childs-dress-shadow-box?ref=shop_home_active
https://www.etsy.com/listing/124337217/little-girl-antique-shoe-shadow-box?ref=shop_home_active

https://www.etsy.com/listing/124343902/vintage-blue-and-yellow-little-boy?ref=shop_home_active

https://www.etsy.com/listing/127488220/vintage-blue-pinstripe-little-boy-jacket?ref=shop_home_active

https://www.etsy.com/listing/127489838/little-girl-vintage-strawberry-bonnet?ref=shop_home_active

If you're interested in a custom order please email me. I can create items with your child's name or an item you have that you'd like to have showcased.

Thursday, April 11, 2013

Jewelry Organizers - A Fun New Twist

In addition to the suitcase projects I've been working on, I also started making jewelry organizers out of old picture frames and vintage or reclaimed fabrics. I began this project last summer purely for displays for my own vintage jewelry.

I created a three-color scheme set up and painted, cut, drilled, covered and glued a little over a dozen frames in various sizes to create a "jewelry wall" as I like to call it. Each of the frames connects with the others through a series of hooks and hoops and is portable, as I attach them to a clothing rack that's been modified to hold them.

After launching my display I received a lot of compliments on the idea and several people indicated they'd be interested in purchasing jewelry organizing frames if I ever made them to sell. So I began to collect more frames, fabric and of course - spray paint!

I've seen several versions of this idea, but none quite like the ones I've created. Others use lace, which is great for hook earrings, but doesn't work for anything else. I've also seen the frames filled with chicken wire or strands of wire - again, great for hook earrings, but nothing else! I use a really light weight plyboard, cut to fit each frame, then drilled for cup hooks. These are sturdy, can hold necklaces, bracelets, earrings, scarves and more! Or if you don't like the idea of using them for jewelry - they make great entryway hooks for keys and other important items. 

Here's a little view of the process of making the frames:

Painting the frames.

The three-color scheme.
Cutting the boards.
Attaching the fabric.
Assembling the frames.

Finished product.


The jewelry "wall".

Saturday, April 6, 2013

Cottages and Bungalows - Blendo Glass Feature

A few weeks back I was contacted by an editor from Cottages and Bungalows magazine after she saw my blog post about my West Virgina Glass Company Blendo collection. This post is probably the most popular post I've ever wrote, mainly because there isn't a lot about West Virginia Glass Company out there. My post had most of the details I could find and lots of photos of my collection. I've even added to it since that post back in 2010.

After several back and forth emails I set up a photo shoot in my house and provided her with a write up about the brand, the Blendo line and tips for collecting. The magazine's May 2013 edition features a three-page spread that showcases Blendo and features many of my photos, quotes and information from me and gives a link back to my Etsy shop!

I can't express how excited I was by this opportunity and I'll be ecstatic if it sparks the collecting bug in other people! There's nothing like a Blendo set to add a punch of color to your decor and serving ware!

Go out and check out the magazine if you can - the edition is all about color and has tons of DIY ideas and tips too!


Sunday, March 31, 2013

The Making of Suitcase Shelves

One of my new ventures has been creating furniture and accent pieces from vintage suitcases. A few months before leaving St. Louis I saw something on Pintrest that sparked my fancy - a very unique wall display using vintage suitcases as shelves. However I didn't like the idea that each shelf was mainly a "ledge." I was determined to figure out how I could do this and do it better.

The inspiration!
I put out a Craigslist feeler and found someone getting rid of a ton of vintage suitcases and I quickly picked them up. Fast forward a few months and you'd be shocked how handy those suitcases came to be during a move :).

After we had unpacked all the suit cases I was determined to figure out a way to make the shelves, especially since the boyfriend would be jobless for a bit and is a carpenter by trade. Together we went to Home Depot and scoped out all different types of items we could use to create the shelf bracketing system. I wanted something that would be easy for people to install, but also sturdy. My thought process was that if we could put u-shaped brackets inside of the suitcase and then find L-shaped mounting brackets it'd be a breeze to install the L-shaped brackets and slip the suitcase shelves onto them. It took us a bit to find all the materials (the u-shaped brackets were tricky to locate) but we did!
The prototypes


The results are suitcase shelves that are 10in in depth - giving you plenty of space to actually display items, that are sturdy and functional!

I'd like to start doing custom orders - helping people determine styles and color combos and creating rocking centerpiece displays like the one I ended up installing in our living room from my prototype pieces.

What do you think? Would you like something like this in your home?
The finished results!

Interested in ordering suitcase shelves? Fill out the form attached and email it to me at mandyheth@gmail.com

Tuesday, March 26, 2013

My New Work Space

One of the most lovely things about moving into a new house is the ability to completely claim a new space. To implement new projects and to make something truly your own! When we selected our new home in KC one of the really nice things about it was the third bedroom in the basement. It was pretty large, had its own small half bath and a closet - perfect for storing all of my vintage gear and the items I use to promote and display my wares. A true, dedicated work space!

The Work Space Before
My super awesome boyfriend took all of my ideas and brought them to life! We built counter height workstations - a big L-shape made from unfinished doors. This gave me loads of room to put my photo box set up, my computer, shelves to hold crafting supplies and places to store tubs under the counters. I put my personal flair to work by decoupaging the counters with vintage clothing patterns!

Before Part 2
The clothing racks.
 We also bought the items to create a closet clothing rack, but instead of putting them in the closet, we created two clothing racks along one of the walls, giving me a way to easily display dresses, shirts, coats, skirts and more! Not only is it easy for me to see what I have, but it makes picking items for shows simple and quick!

We also put a shelf on the top rack, giving me additional storage for items that I don't use a lot, but wanted to keep! 

After everything dried and settled I organized all those lovely boxes you see in my "before" photos. Hung up loads of vintage clothes, put shelves on the counters, put in an area to house my computer and printer and set up my photo shooting locations - one corner for the clothing and an area on the counter for my photo box set up.


The vintage clothing patterns I used for the decoupage.
Getting it all done feels almost "magical" and hopefully will help me stay more organized and keep all my projects from creeping into the other rooms in the house!
The counter workspace before decoupaging.


A work in progress - applying the sewing patterns to the counters.

The counter as it dries and finishes.


Friday, March 22, 2013

New Ventures

So I've been really quiet on the blog lately - like five months of quiet... Well a lot has happened in those five months! The biggest news - I moved to a new city. I'm now a Kansas City resident. It was a lot of fast turn around and craziness surrounding the move, which took place the week before Christmas. Then there was the "settling in" phase - the unpacking, decorating, figuring out where the grocery store was, that kind of thing!

After that was the "now what" phase of trying to figure out what I was going to do with my vintage business, how was I going to restructure and start again and where did I need to be. So after all of that I'm excited to start sharing again some of what I've been up to and all the things that have been keeping me busy since the last post in November!

Stay tuned!

Here's a sneak peek at some of the "new" direction I'm taking - combining the need to decorate my new house with the new ideas for Vintage Baubles & Bits!